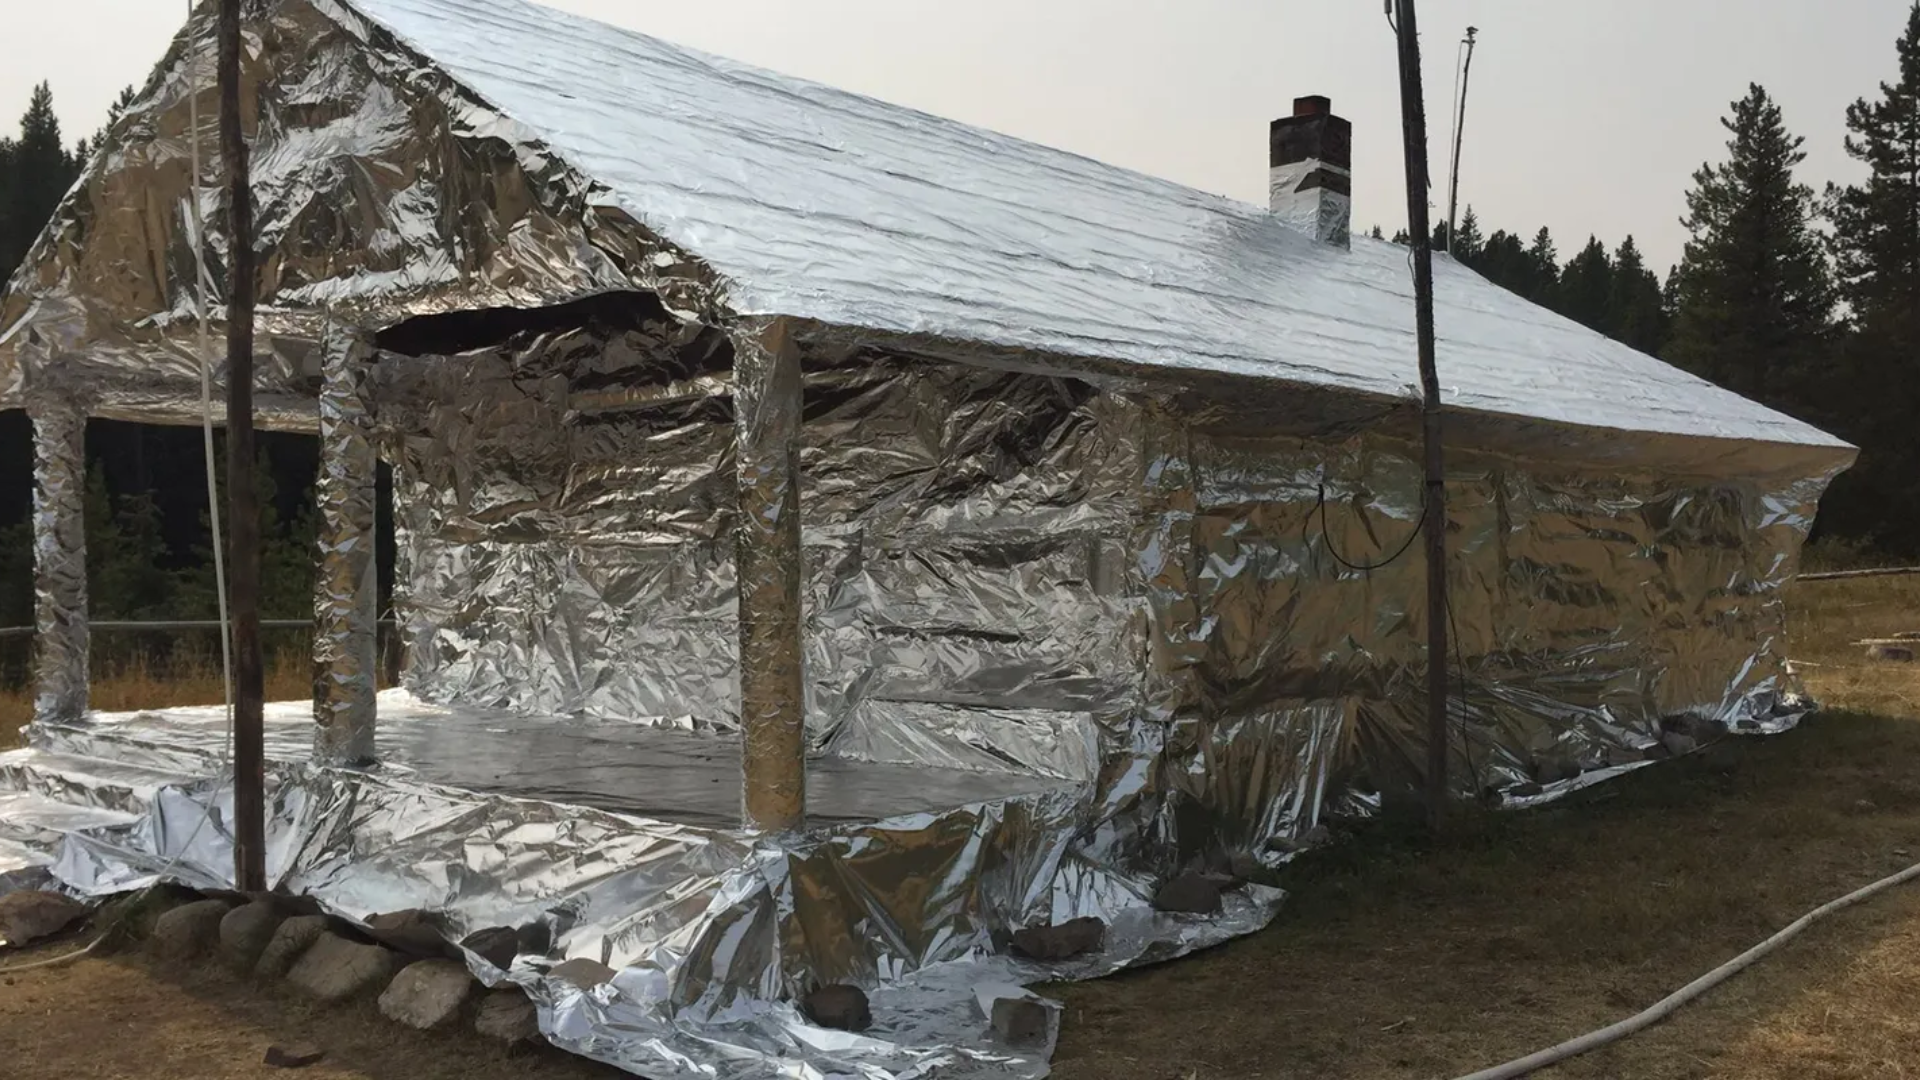
You’ve likely seen the striking images after a wildfire: a single home, wrapped in what looks like giant aluminum foil, standing untouched amidst the devastation. That powerful tool is a fire wrap. For decades, it has been the go-to defense for professional firefighters, and now this proven technology is available to homeowners. It’s crucial to understand this is not a fire blanket—which offers no real protection for a structure—but a specifically engineered shield against radiant heat and embers. This guide will walk you through exactly how a fire wrap works and how to make it part of your home’s defense plan.
Key Takeaways
- Prioritize Shielding Vulnerable Entry Points: Wildfires often claim homes through small openings. Use a fire wrap to create a physical barrier over your most at-risk areas—like vents, eaves, and under decks—to block wind-driven embers from getting inside.
- Ensure a Flawless Application: A fire wrap’s effectiveness hinges on its installation. Whether you opt for a DIY approach with a partner or hire a professional for a complex job, the goal is a tight, seamless fit that can withstand high winds and heat.
- Integrate Fire Wrap into a Larger Plan: A fire wrap is a powerful, deployable shield, not a standalone solution. Combine it with fundamental home hardening tasks, like creating defensible space and clearing debris, to build a comprehensive and resilient defense strategy.
What Does ‘Fire Wrap’ Actually Mean?
The term “fire wrap” can be a bit confusing because it’s used to describe several different products with distinct purposes. While people sometimes use terms like fire wrap, fire shield, or even fire blanket interchangeably, they refer to very different technologies. For instance, a small fire blanket is designed to smother a kitchen fire, not protect a house from a wildfire. A structural fire shield, on the other hand, is specifically engineered to reflect radiant heat and block embers from igniting a building. To clear things up, let’s look at what “fire wrap” typically means in commercial and industrial settings, where the term is most common.
Fire Wraps for Commercial Buildings
In the construction world, fire wraps are specialized insulation materials designed to add fire resistance to a building’s internal systems. Their main job is to contain a fire within a specific area and prevent it from spreading through ducts, pipes, or cable trays, which can otherwise act like highways for flames and smoke. These wraps are a critical component of a building’s passive fire protection system—the built-in infrastructure that helps control fire without any active intervention. They are rigorously tested and rated to withstand high temperatures for specific durations, giving occupants more time to evacuate safely and firefighters better conditions to work in.
Duct and HVAC System Protection
One of the most common applications for fire wraps is on ductwork, especially in commercial kitchens and large HVAC systems. Grease ducts, for example, pose a significant fire risk, and a specialized fire barrier duct wrap is used to encase them. This material is designed to keep extreme heat from transferring to surrounding combustible materials. Similarly, ventilation ducts that pass through different fire-rated walls or floors must be protected to maintain the integrity of those barriers. The wrap essentially insulates the duct, ensuring that a fire in one part of the building doesn’t quickly spread throughout the entire ventilation network.
Pipe and Cable Wraps
Just like ducts, pipes and electrical cable trays can compromise a building’s fire containment strategy. Fire wraps for these systems are flexible, foil-encapsulated blankets made from fire-resistant fibers. When wrapped around pipes or bundles of cables, they prevent fire from passing through openings in walls and floors. This is especially important for maintaining the function of critical systems, like emergency lighting or communication cables, for as long as possible during a fire. These wraps are a key part of ensuring a building’s internal compartments remain sealed off from one another in an emergency.
Fire Wraps for Critical Infrastructure
Beyond commercial buildings, fire wraps are also used to protect essential public and private infrastructure from environmental threats like wildfires. In this context, the goal isn’t just about containment within a structure but about shielding vital assets from an external fire front. Utility companies, for example, have a massive amount of equipment exposed to the elements in high-risk areas. Protecting these assets is crucial for maintaining services like power and communications, especially during a natural disaster when they are needed most. This application demonstrates the versatility of fire-resistant materials when adapted for specific, large-scale protective needs.
Protecting Utility Poles from Wildfires
Wooden utility poles are extremely vulnerable to wildfires. To address this, utility providers like the Bonneville Power Administration have started using fire-resistant wraps to shield the base of their poles. These wraps are often made from materials like fiberglass mesh with a special coating that expands when exposed to heat. This expansion, known as intumescence, creates a char-like barrier that insulates the wood from the intense heat of a passing fire. By protecting thousands of poles in high-risk corridors, companies can prevent widespread power outages and avoid the costly and time-consuming process of replacing burned infrastructure after a fire.
Fire Wraps vs. Fire Collars: What’s the Difference?
While exploring fire protection, you might also come across the term “fire collar.” Though they serve a similar purpose to some types of fire wraps, their design and application are different. Fire collars are pre-formed devices, typically with a metal shell, that are installed around pipes passing through walls or floors. Inside the collar is an intumescent material that expands when heated, completely sealing the opening around the pipe to block fire and smoke. The main difference, as explained by experts at Quelfire, is that a fire wrap is a flexible material without a rigid shell, secured with tape, while a collar is a solid, self-contained unit. This distinction matters because each is suited for different scenarios, reinforcing the importance of using the right, specifically designed product for the job.
How Does a Fire Wrap Shield Your Home?
If you live in an area where wildfires are a real threat, you’ve probably heard people talk about fire wrap. Think of it as a protective blanket for your home or other structures on your property. Its main job is to shield buildings from the two biggest dangers during a wildfire: airborne embers and intense radiant heat. While professional firefighters have used this technology for years to protect critical infrastructure, it’s now a tool that homeowners can use to add a serious layer of defense to their property when a fire is approaching.
The Science Behind How Fire Wraps Work
The science behind fire wrap is pretty straightforward. The material, typically a laminated aluminum foil, reflects up to 95% of the radiant heat from a wildfire. This is crucial because intense heat alone can cause wood, siding, and other materials to ignite, even without direct contact from flames. More importantly, fire wraps create a barrier against flying embers, which are a primary cause of home ignition during a wildfire. These embers can travel over a mile ahead of the fire front and easily get into small openings. A properly installed wrap seals off these vulnerable entry points, preventing embers from getting inside.
What Are the Best Fire Wrap Materials?
Most fire wraps are made from aluminum foil laminated to a woven fabric like silica or fiberglass, which gives it strength and tear resistance. This combination creates a material that is both highly reflective and durable. You can find it in different forms, from smaller rolls designed for wrapping posts or sealing vents to massive sheets. Some companies, like FireFoil, offer large-format shields that can be over 20 feet wide and 100 feet long, making it possible to cover an entire side of a house with a single piece. This variety allows you to choose the right size and strength for the specific parts of your property you need to protect.
Intumescent Materials
Some fire wraps use intumescent materials, which are designed to do one thing really well: expand when they get hot. This expansion creates a thick, char-like barrier that helps seal off gaps and joints in a structure. Think of it as a self-sealing defense. While not typically used to cover an entire house, this material is incredibly useful for protecting specific vulnerabilities. For example, it’s often integrated into wraps designed for pipes or utility poles, where sealing off small openings from heat and flames is the top priority to prevent internal damage.
Coated Fiberglass Mesh
Another material you’ll find, especially in wraps for infrastructure like utility poles, is a coated fiberglass mesh. The strength comes from the fiberglass, which provides a durable base, while the special coating is the active ingredient. When exposed to fire, this coating reacts by swelling up, much like an intumescent material. This reaction forms a protective layer that insulates the object from extreme heat. It’s a tough, resilient option built for specific industrial applications where durability and heat insulation are the primary goals for protecting critical assets.
Foil-Faced Fiber Blankets
You may also come across foil-faced fiber blankets, but it’s important to understand their specific use. These are engineered insulation products, like the 3M 615+ Fire Barrier Duct Wrap, designed to protect internal systems like HVAC ducts from fire. The foil face helps resist high heat, while the fiber blanket provides insulation. However, these are not the same as the deployable shields used to protect the exterior of a home from a wildfire. The term “fire blanket” can be misleading; a simple fire blanket offers no real protection for a structure against a wildfire’s intense, prolonged assault.
Aluminum-Based Shields for Radiant Heat
When it comes to wrapping an entire home, aluminum-based fire shields are the proven solution. This is the technology that professional firefighters and the US Forest Service have trusted for decades. The material, a strong fabric laminated with aluminum foil, is designed to reflect up to 95% of the radiant heat from a wildfire—the invisible force that can ignite your home from a distance. Unlike other materials designed for specific components, these shields, like those pioneered by FireFoil, are made to cover large surfaces, blocking both intense heat and the storm of embers that are a primary cause of home loss in wildfires.
Are Fire Wraps Worth the Investment?
Let’s be direct: fire wrap isn’t a magic solution, and it’s important to understand the trade-offs. On the plus side, it has a proven track record of saving homes that would have otherwise been lost. It provides a powerful, temporary defense against radiant heat and embers. However, it can be an investment, and deploying it takes time and effort, which can be stressful when a fire is near. Most wraps are also designed for a single use. For many, the peace of mind and proven protection are well worth the cost and effort, especially when you consider the alternative.
What to Look For in a Quality Fire Wrap
When you’re looking for a fire wrap, focus on a few key features. First, check the material’s ability to block radiant heat and embers—this is its whole purpose. Look for professional-grade materials that have been tested and used by agencies like the US Forest Service. Second, consider how it’s installed. Modern systems are much easier to deploy than older versions that relied on staples. Look for wraps that use straps, heat-resistant tape, and weights, which allow for a faster, more secure application. A system that is easier to put up is one you’re more likely to use effectively when it counts.
Where Does Your Home Need Protection Most?
When you think of a wildfire, you might picture a massive wall of flames. But the biggest threat to your home often comes from something much smaller: embers. These tiny, wind-driven firebrands can travel a mile or more ahead of the main fire. According to the National Fire Protection Association, preventing embers from entering and igniting your home is the most critical step you can take. Your home’s most vulnerable spots are typically the roof, vents, eaves, decks, and any area where debris can accumulate. A careful walk around your property to identify these weak points is the first step in an effective defense plan.
Mapping Your Home’s Most Vulnerable Spots
A high-quality fire wrap is designed to shield your home from a wildfire’s primary dangers: radiant heat and embers. When deployed, it acts as a barrier, covering vulnerable structures to prevent ignition. Think beyond just the main house and plan to cover other flammable items like woodpiles, sheds, or propane tanks. The goal is to create a protective shield over anything that could easily catch fire from a stray ember. Our aluminum-based shields are specifically designed to cover large surfaces and smaller architectural features, giving you comprehensive protection.
Do Different Areas Need Different Wraps?
Your home’s building materials play a huge role in its ability to withstand a wildfire. Non-combustible siding like stucco, metal, or concrete offers far more protection than untreated wood siding or wood shake shingles. While you may not be able to change your home’s construction, knowing where you have flammable materials is key. This helps you prioritize which areas need the most robust protection from a fire wrap. Pay special attention to wooden decks, fences that attach to the house, and any decorative wooden features, as these are prime targets for embers.
Shielding Your Eaves, Vents, and Decks
Architectural details are often the most vulnerable entry points for embers. Open eaves can trap hot air and embers, while unscreened vents offer a direct path into your attic or foundation. Decks, especially those with gaps where leaves can collect, are also high-risk. During a wildfire event, these are critical areas to cover with a fire wrap. Our technology has been trusted for decades to protect critical infrastructure and national monuments, proving its effectiveness in shielding these exact types of complex, vulnerable structures from harm.
Your Guide to Choosing and Installing a Fire Wrap
Choosing the right fire wrap and installing it correctly are the two most important steps in effectively shielding your home. A high-quality wrap is only as good as its application, so paying close attention to the details here is essential. This guide will walk you through selecting the best materials for your needs and the fundamental steps for a secure installation, ensuring you get the protection you expect when it matters most. Think of this as your playbook for deploying a critical layer of defense against wildfire threats.
Decoding Fire Ratings and Safety Standards
When you’re comparing fire wraps, you’re looking for a material that can stand up to the primary threats of a wildfire: radiant heat and flying embers. Professional-grade shields are specifically engineered to reflect intense heat and prevent tiny, wind-driven embers from igniting vulnerable surfaces on your home. Look for products with proven performance and testing data. While there isn’t a single universal “fire wrap” rating, you can look for materials that meet standards for fire resistance and heat reflection. The goal is to find a wrap that provides a continuous, non-combustible barrier between the fire and your home, a principle that guides organizations like the Insurance Institute for Business & Home Safety in their research.
Understanding Heat Resistance and Activation Time
When a wildfire approaches, every second counts. That’s why a shield’s ability to perform instantly is so important. Some specialized fire wraps, like those used on utility poles, are designed to activate within seconds of flame contact and can withstand temperatures over 2,000°F. However, for protecting a home, the most critical factor is reflecting radiant heat, which can ignite a structure long before flames arrive. Professional-grade aluminum shields like FireFoil don’t have an “activation time” because they work instantly, reflecting the vast majority of radiant heat the moment it hits. This immediate performance is what prevents siding from melting and windows from breaking, keeping your home safe during those crucial first moments of exposure.
Common Safety Standards and Certifications
While there isn’t a single, universal certification for deployable wildfire shields, you can look for proof of performance. Many fire-resistant materials are tested against standards from organizations like the National Fire Protection Association (NFPA) or UL. However, it’s important to distinguish between materials designed for internal building components and those meant to shield an entire structure from a wildfire. The most meaningful certification comes from real-world use. Look for technology that has been trusted and deployed by professional agencies. For over two decades, FireFoil has been the go-to choice for the US Forest Service to protect everything from historic cabins to critical infrastructure, a testament to its reliability where it matters most.
How Much Does Fire Wrap Protection Cost?
The cost of a fire wrap system can vary widely based on the size of your home and the quality of the material. As a general benchmark, you might see costs around $1 per square foot, which could put the total for an average-sized home under $5,000. It’s helpful to view this not just as a purchase but as an investment in protecting a significant asset. Professional-grade systems, like those trusted by the US Forest Service, may have a higher initial cost but offer superior durability and proven effectiveness. You can explore a products and pricing guide to get a clearer idea of what to budget for a system tailored to your property’s specific needs.
Gathering the Right Tools and Equipment
Gone are the days of struggling with just a staple gun. Modern fire wraps are designed for more efficient and secure installation. To apply them correctly, you’ll typically need a basic set of tools. This often includes heat-resistant tape for sealing seams, heavy-duty straps or fasteners to hold the material in place against wind, and sometimes weights for securing the bottom edges. Always check the manufacturer’s recommendations, as the ideal installation hardware is designed to work with the specific material. Using the right equipment ensures a tight, secure fit that won’t fail under pressure.
How to Apply Your Fire Wrap, Step by Step
While you should always follow the specific instructions provided with your fire wrap, the general application process follows a logical sequence. Start by preparing the structure, ensuring surfaces are clear of debris. Begin wrapping from the top of the structure and work your way down, overlapping the seams like shingles on a roof to prevent embers from getting underneath. Secure the wrap tightly as you go, paying special attention to corners, eaves, and vents. Ensure all edges are completely sealed and fastened down. For many, a fire wrap is a crucial short-term defense deployed before an approaching fire, giving you a powerful tool to protect your home.
Common Installation Mistakes to Avoid
A poorly installed fire wrap can create a false sense of security. One of the most common mistakes is not securing the material tightly enough, allowing wind to get underneath and tear it loose. Another is leaving gaps or failing to properly overlap seams, which gives embers a direct path to your home. It’s also critical to use the correct fasteners—regular staples or tape can melt and fail in high heat. Firefighters often note that improper, time-consuming installations are a key reason these systems can fail homeowners. Taking the time to do it right, or hiring a professional, ensures your shield performs as intended. This is why proven technology and clear instructions are so important.
Should You DIY or Hire a Pro?
Deciding whether to install a fire wrap yourself or hire a professional comes down to your home’s complexity, your comfort level with the task, and your timeline. While a DIY installation is definitely achievable for many homeowners, there are situations where calling in an expert is the smartest move. Professional crews, like those trusted by the US Forest Service, have the experience to work quickly and efficiently, ensuring every vulnerable point is covered correctly, especially on large or architecturally complex buildings.
If you’re facing an imminent threat and have no experience, or if your property is particularly large or has hard-to-reach areas, hiring a professional team provides peace of mind that the job is done right. They have the specialized equipment and training to deploy shields under pressure. However, with the right planning and a bit of help, a DIY approach can be a practical and cost-effective way to protect your home.
Signs It’s Time to Call a Professional
Hiring a professional is often the best choice for large, multi-story homes or buildings with intricate architectural details like numerous dormers, complex rooflines, or extensive decking. If you lack the physical ability, time, or confidence to handle the installation safely and quickly, a pro is the way to go. They can assess your property’s unique vulnerabilities and ensure a tight, secure fit that offers maximum protection. While it’s an added expense, the expertise and efficiency a professional brings can be invaluable, especially when a wildfire threat is looming and time is of the essence. Think of it as an investment in getting the job done right when it matters most.
Tips for a Successful DIY Installation
If you decide to take on the installation yourself, preparation is key. Modern fire wraps are designed to be much more user-friendly than older versions. Instead of relying solely on staples, you can use a combination of straps, high-temperature tape, and weights to secure the material. Always work with at least one other person—this is not a solo job. With a partner, you can wrap a standard 1,600-square-foot home in about 30 minutes once you get the hang of it. Before you start, read the manufacturer’s instructions carefully and watch any available installation videos. Lay out all your FireFoil shields and tools so you’re ready to work efficiently when the time comes.
Staying Safe During Your DIY Installation
A fire wrap is just one part of a comprehensive fire defense plan. Your first line of defense is creating a buffer zone around your property. This means keeping your lawn mowed and, if possible, watered for at least 75 to 100 feet around your home. It’s absolutely critical to clear all flammable materials—like plants, woodpiles, patio furniture, and mulch—from the area within five feet of your foundation. This “noncombustible zone” prevents embers from igniting materials that could carry fire directly to your house. These steps are essential whether you install a fire wrap or not, as they dramatically reduce the risk of ignition from flying embers.
Where to Find Installation Help and Resources
You don’t have to choose between a full professional installation and going it completely alone. You can often find local contractors or experienced handypeople who can assist with the deployment. Fire wrap can also serve as an excellent interim solution, giving you proven protection while you plan for more permanent, long-term upgrades like fire-resistant siding or roofing. If you have questions about the best way to tackle your specific property, don’t hesitate to reach out for guidance. Companies with deep experience, like FireFoil, can often provide the advice you need to make an informed decision and connect you with the right resources.
How to Maintain Your Fire Wrap for Lasting Protection
Investing in a fire wrap is a significant step toward protecting your property, but it’s not a one-and-done solution. Think of it like any other critical component of your home, such as your roof or foundation—it needs occasional attention to ensure it’s ready to perform when you need it most. Fortunately, maintaining your fire wrap is straightforward. A simple routine of inspection and care will give you peace of mind, knowing your first line of defense against wildfire is secure. High-quality materials like FireFoil’s aluminum shields are designed for incredible durability, but regular checks are still a smart practice. By staying proactive, you can catch minor issues before they become problems and extend the life of your system for years to come.
Your Simple Fire Wrap Inspection Checklist
Set a recurring calendar reminder to inspect your fire wrap at least once a year before fire season begins. It’s also wise to check it after any severe weather event. During your inspection, walk the perimeter of your property and look closely at the material’s surface. You’re searching for any signs of damage, such as cracks, tears, punctures, or significant abrasions. Pay special attention to seams and edges, as these areas can experience more stress. Check that all fasteners and anchoring points are still secure and haven’t loosened over time. A thorough visual check helps ensure every inch of the wrap is intact and ready to provide a continuous barrier against embers and radiant heat.
How Does Weather Affect Your Fire Wrap?
Your fire wrap is constantly exposed to the elements, from intense UV rays to wind, rain, and even snow. While professional-grade materials are built to withstand harsh conditions, long-term exposure can eventually cause wear. Different materials have varying levels of resistance to environmental factors. For example, prolonged sun exposure can make some materials brittle over time, while high winds can test the security of fasteners and seams. Understanding how your specific wrap material holds up to your local climate is key. Always refer to the manufacturer’s guidelines for information on its durability and any recommended actions to mitigate the effects of weather on building materials.
The Right Way to Store Your Fire Wrap
If you use a deployable fire wrap system, proper storage is essential for its longevity and effectiveness. When not in use, your wrap should be kept in a clean, dry, and climate-controlled environment, like a garage or shed. Keep it away from direct sunlight, moisture, and sharp objects that could cause punctures. Most manufacturers recommend carefully rolling the material instead of folding it, as sharp creases can create weak points over time. Storing it in its original packaging or a dedicated protective container is ideal. When stored correctly, some materials have an almost indefinite shelf life, ensuring they’ll be in perfect condition when an emergency arises.
Signs It’s Time for a Replacement
During your regular inspections, you might find issues that go beyond a simple fix. It’s important to know when a section of your fire wrap needs to be replaced. Obvious signs include large tears or punctures that can’t be easily patched. You should also look for changes in the material itself. If you notice delamination, where the layers of the wrap are starting to separate, or if the material has become stiff and brittle, its protective qualities may be compromised. Similarly, significant discoloration or a chalky texture can indicate UV degradation. Don’t forget to check the hardware—if fasteners are rusted, bent, or missing, they should be replaced immediately to ensure the wrap remains secure.
Simple Cleaning and Care Tips
One of the best features of a high-quality fire wrap is that it requires very little maintenance. Products from FireFoil are designed to be left alone once properly installed. However, you’ll want to keep the surface clear of flammable debris. Periodically remove any accumulated leaves, pine needles, or dirt, as these can become fuel in a fire. In most cases, a gentle rinse with a garden hose is all you need. If you encounter more stubborn grime, a soft cloth with mild soap and water will do the trick. Avoid using pressure washers, harsh chemical cleaners, or abrasive brushes, as they can damage the wrap’s reflective surface and compromise its ability to repel radiant heat.
Creating a Complete Home Fire Defense Strategy
A fire wrap is a powerful tool in your wildfire defense toolkit, but it shouldn’t be the only one. The most resilient homes are protected by a multi-layered strategy that combines different methods and materials. Thinking about your property’s defense as a complete system—from the landscaping to the roof—gives you the best chance of weathering a wildfire. Let’s walk through how to build a comprehensive plan that incorporates fire shields and other effective tactics.
Layering Your Defenses Beyond a Fire Wrap
Fire wraps, like FireFoil, are designed to shield your home from the two biggest threats during a wildfire: radiant heat and flying embers. When properly installed, they create a barrier that can stop embers from lodging in vulnerable spots and igniting a fire. But this shield works even better when it’s protecting an already resilient structure. Combining fire wrap with long-term home hardening measures is the gold standard. This includes using fire-resistant building materials for roofing and siding, installing double-paned windows, and clearing flammable debris from around your home. Think of it this way: home hardening reduces your home’s overall flammability, and fire wrap provides a critical, deployable shield when a fire is imminent.
Should You Consider Automated Defense Systems?
Technology is bringing new options to the table for home defense. Automated systems are designed to protect your property even if you aren’t there or before fire crews can arrive. Some of the most common systems involve exterior sprinklers that douse your home and surrounding property with water or fire-retardant foam. These systems are often activated by sensors that detect extreme heat or can be triggered remotely from your phone. While they can be a significant investment, automated wildfire defense systems offer an active layer of protection that can complement the passive barrier of a fire wrap. They are particularly useful for protecting outbuildings, critical infrastructure, or homes in very remote areas.
Exploring Other Fire-Retardant Solutions
Beyond wraps and automated sprinklers, fire-retardant gels are another option to keep on hand. These gels are mixed with water and sprayed onto your home’s exterior, creating a sticky, heat-absorbing layer that can deflect flames and embers for several hours. Products like Barricade Fire Gel are designed for homeowners to apply with a standard garden hose ahead of an approaching fire. While effective, they are temporary and require water to apply, which may be scarce during a wildfire event. This is where a product like FireFoil has an advantage, as it provides a physical, water-free barrier. Considering all your options helps you choose the right tools for your specific situation and property.
Putting Your Family’s Emergency Plan in Place
Having the best tools won’t help if you don’t have a plan to use them. Your emergency plan should detail exactly when and how you will deploy your defenses. For many, fire wrap is an excellent immediate solution to protect a structure while you budget for more permanent, fire-resistant upgrades. Your plan should include having your FireFoil shields and installation gear stored in an accessible place. Practice a deployment run so you know exactly how long it takes and what challenges you might face. Part of a solid plan is also knowing your evacuation routes and having a go-bag ready. A well-thought-out wildfire action plan ensures you can act quickly and effectively when every second counts, protecting both your property and your family.
How to Choose the Best Fire Wrap for Your Home
Choosing the right fire wrap is a significant decision, but it doesn’t have to be overwhelming. Think of it as investing in peace of mind. The key is to understand your options, know where to look, and learn how to evaluate what’s best for your property. This guide will walk you through the essential steps to find a reliable fire wrap system that fits your needs and budget, so you can feel confident in your home’s defense plan.
Comparing the Top Fire Wrap Brands
When you start looking at fire wraps, you’ll notice a few different approaches to protection. Some products, like fire-retardant gels, are designed to be sprayed on surfaces to create a temporary, last-minute barrier. For a more durable and reusable solution, look to structural shields. At FireFoil, our aluminum-based Wildfire Ember & Fire Shields are engineered to reflect radiant heat and block embers—the same technology trusted by the US Forest Service to protect critical infrastructure. When comparing, consider the material, reusability, and the specific threats you face, whether it’s direct flames or a shower of embers from a distant blaze. A reusable shield offers a proactive defense you can deploy season after season.
Where to Buy a Quality Fire Wrap System
For professional-grade systems, it’s often best to purchase directly from the manufacturer. This ensures you get authentic products, expert guidance, and the right components for your specific home. Companies that have been in the business for decades, like FireFoil, can provide detailed consultations to match you with the correct shield strength and size. While some smaller fire protection items might be available through general online stores, a comprehensive home wrapping system is a specialized purchase. Going direct gives you access to the people who designed the product and know exactly how it performs in real-world scenarios, giving you a direct line to the experts.
Smart Ways to Save on Your Purchase
Protecting your home is an investment, but there are ways to manage the cost. The most effective step you can take is to contact your homeowner’s insurance agent. Many providers offer significant discounts for wildfire mitigation efforts, including installing structure-protection systems and creating defensible space around your property. Ask your insurer what specific actions qualify for a premium reduction. While the upfront cost of a quality fire wrap system is a factor, these savings can add up over time. Think of it not just as an expense, but as a long-term investment in securing your property and potentially lowering your annual insurance costs for years to come.
How to Read Product Reviews Like a Pro
When sifting through reviews, look for details that go beyond a simple star rating. Seek out testimonials from homeowners in regions similar to yours who face the same type of wildfire risk. The most helpful reviews will mention specifics about the installation process, how the material held up to weather over time, and its performance during an actual fire event. Pay close attention to case studies and reviews from professional agencies. When organizations like the US Forest Service trust a product to protect national monuments, it speaks volumes about its reliability and effectiveness under the most extreme conditions. These professional endorsements are often more telling than dozens of individual consumer ratings.
Frequently Asked Questions
Is fire wrap a one-time use product, or can I use it for multiple fire seasons? This really depends on the specific product you choose. While some lighter-duty wraps are designed for a single deployment, professional-grade shields like FireFoil are built for durability and reuse. If the shield isn’t damaged during a fire event, you can carefully remove, inspect, and store it for the next time you need it. Think of it as a long-term investment in your property’s safety that you can rely on year after year.
Realistically, how much time does it take to install a fire wrap when a fire is approaching? The time it takes depends on the size of your home and how prepared you are. With a bit of practice and a partner, you can deploy shields on a standard-sized home in under an hour. The key is to do a dry run before fire season starts. This helps you get familiar with the process, organize your tools, and identify any tricky spots so you can work quickly and confidently when it really counts.
Does using a fire wrap guarantee my home will be safe from a wildfire? No single tool can offer a 100% guarantee against a wildfire. A fire wrap is an incredibly effective layer of defense that dramatically increases your home’s chances of survival by shielding it from radiant heat and embers. However, it works best as part of a complete defense strategy that includes creating defensible space and hardening your home with fire-resistant materials.
Do I need to cover my entire house, or can I just protect the most vulnerable areas? You don’t necessarily have to wrap your entire home to make a significant difference. You can focus your efforts on the most vulnerable areas, such as wooden decks, large windows facing the likely direction of a fire, and walls with combustible siding. Protecting these critical points can effectively prevent embers from finding an entry point and igniting your home.
How is a physical shield like FireFoil different from fire-retardant gels or sprinkler systems? The main difference is the approach to protection. Gels and sprinklers are active, temporary systems that require water and are often applied at the last minute. A physical shield like FireFoil provides a passive, water-free barrier that you can deploy ahead of time. It physically blocks embers and reflects radiant heat for an extended period without needing any additional resources, which can be a major advantage when water pressure is low or unavailable.


